Signal routing with the mixing board suite
Signal routing in SuperCollider has a couple of complicating factors:
- Order of execution: generally, if one synth node is processing the output of another, the processing node (the effect) has to come later in the execution chain than the source. The exception is feedback loops, which can be implemented with InFeedback.
- Object-style coding (using synth and group objects) makes it easy to create and maintain nodes, but it allows for sloppy programming habits that can leave node order pretty much up to chance.
- Managing audio buses, while not difficult, can be confusing.
MixerChannel and its supporting classes provide a structure to manage these issues transparently, allowing you to spend more time on what you want to happen sonically, instead of reinventing the nuts and bolts for every effect.
Structure
Each MixerChannel divides its functions into three groups on the server:
- The fader group is the outer layer. It contains the other two groups, as well as the supporting synths (the fader/panner, aux sends, scope, recording, etc.). There is usually no need to put any of your own synths manually into this group. It's reserved for the MixerChannel's internal use.
- The synth group sits at the head of the fader group. All of your sound-producing synths go here.
- The effect group immediately follows the synth group. All of your sound-processing synths go here.
Convenience methods help you place synths in the appropriate group.
myChannel.play(something, args)  // play the synth in the synth group
myChannel.playfx(something, args)  // play the synth in the effect group
"Something" can be a string or symbol, a crucial-library Instr or Patch, or a function.
Here is an example, using one channel to play a synth through a simple multitap delay effect. (The synthdefs use some favorite coding techniques of mine, which will be described in another tutorial on this site.)
The first code block will be required for all examples in this tutorial.
s.boot;

// gather the players
// you must execute this code block before running any examples in this tutorial
(
SynthDef(\blipDelay, { |outbus, bufnum, t_repan|
   var dly, dtime, sig, newdly, bufRate;
   sig = In.ar(outbus, 2);
      // this technique is borrowed from MultiTap
   RecordBuf.ar(Mix.ar(sig) * 0.7, bufnum, 0, run:-1);
   bufRate = BufSampleRate.kr(bufnum);
   dtime = 0;
   dly = Mix.arFill(3, { |i|
      dtime = dtime + rrand(0.5, 2);
      dly = PlayBuf.ar(1, bufnum, -1, startPos:dtime * bufRate, loop:1);
      Pan2.ar(LPF.ar(dly, 5000 - (i*2000)),
         TRand.kr(-1.0, 1.0, t_repan), (i+3).reciprocal);
   });
   Out.ar(outbus, dly)
}).send(s);

SynthDef(\blipdrop, { |out, freq, freqdrop, dur, trigStart, trigEnd, bufnum|
   var trig, tfreq, amp, timeScale, osc, pan;
   trig = Impulse.kr((tfreq = XLine.kr(trigStart, trigEnd, dur))
      + LFNoise0.kr(12, tfreq * 0.8, tfreq));
   amp = EnvGen.kr(Env(#[0, 1, 0.8, 0], #[0.01, 4, 4].normalizeSum), 1, timeScale:dur,
      doneAction:2);
   pan = LFNoise1.kr(0.8, 0.8);
   freq = freq * LFNoise1.kr(1.2, 0.2, add: Line.kr(1, freqdrop, dur));
   osc = Osc.ar(bufnum, Latch.kr(freq, trig), 0, amp);
   Out.ar(out, Pan2.ar(Decay2.kr(trig, 0.01, 0.08) * osc, pan));
}).send(s);

// other resources needed by the synthdefs
~dlybuf = Buffer.alloc(s, 6.05 * s.sampleRate, 1);
~oscbuf = Buffer.alloc(s, 4096, 1)
   .sine2(({ |i| rrand(3-i, 6-i) + (i+2).reciprocal.rand2 } ! 4), (1..4).reciprocal);
)
Now we can start with the MixerChannel.
// the channel
~chan = MixerChannel(\blippy, s, 2, 2);

// play some synths every so often
(
r = Task({
   {   ~chan.play(\blipdrop, [\freq, rrand(1000, 2000), \freqdrop, rrand(0.4, 0.7),
         \dur, rrand(6, 10), \bufnum, ~oscbuf.bufnum,
         \trigStart, rrand(1.1, 1.4), \trigEnd, rrand(7.0, 10)]);
      rrand(5, 12).wait;
   }.loop;
}).play;
)
At this point the sound is pretty dry. Let's add the delay:
~dlysynth = ~chan.playfx(\blipDelay, [\bufnum, ~dlybuf.bufnum, \t_repan, 1]);
Note here that there was no reference to order of execution parameters (addAction). The MixerChannel places the synths in the right order for you. As the routine continues to generate new synths, they all go into the synth group--always before the effect group--so the effect keeps working.
Before continuing, let's pause the routine.
r.stop;
Master fader and submixes
For convenience, it can be helpful to group several channels together and have a master control for those channels. I typically reserve one MixerChannel as an overall master fader.
~master = MixerChannel(\master, s, 2, 2, level:1);
When creating other MixerChannels, set the outbus argument to the master channel. All signals from those channels will be routed through the master fader before going to the hardware output. In the above example, if the master fader had been created first, we could have defined the channel as:
~chan = MixerChannel(\blippy, s, 2, 2, outbus:~master);
Or, if the channel already exists and you want to change its routing, do this:
~chan.outbus = ~master;
There is no requirement that there be only one master. You could have any number of submix channels feeding into the master, each of which receives input from a handful of channels.
What about order of execution? MixerChannel includes logic to ensure that a MixerChannel feeding into another MixerChannel occurs earlier in the chain. Under most circumstances, there is no need to be concerned about order of execution at all.
Warning: MixerChannel does not directly support feedback loops. Trying to create a feedback loop by feeding channel A into channel B and vice versa will produce an error.
The correct way to create a feedback loop is using InFeedback.
~dly = MixerChannel(\dly, s, 2, 2, level:1);
~src = MixerChannel(\src, s, 2, 2);
~src.newPostSend(~dly, 1);  // this is explained in the next section
~src.play({ |out|
      // read later synths playing on the delay bus
   InFeedback.ar(~dly.inbus.index, 2)
});
   // one second delay with slight amplitude reduction
~dly.playfx({ |out| DelayN.ar(In.ar(out, 2), 1, 1, 0.98) });

(
   // source synths follow InFeedback in the execution chain
~src.play(\blipdrop, [\freq, rrand(1000, 2000), \freqdrop, rrand(0.4, 0.7),
   \dur, rrand(6, 10), \bufnum, ~oscbuf.bufnum,
   \trigStart, rrand(1.1, 1.4), \trigEnd, rrand(7.0, 10)]);
)

// cleanup from this example
[~dly, ~src].do(_.free);
Aux sends and shared effects
Some effects, like reverberation, take a lot of CPU power. Rather than create a separate reverb for each element of a piece, you might want to feed several channels into the same reverb.
You could do it by setting the outbus of the source channels to the reverb, but this has two problems:
- you can't control the amount of wet or dry signal per source channel
- the dry signal is effectively lost, and can't be sent to any other effect
An auxiliary send pipes the signal to another MixerChannel in addition to the main output. Each send has its own level control, so you can control the mix going into the effect channel.
Let's add a reverberator to the above patch. If you haven't created the master MixerChannel as above, do it now.
// execute this only if you didn't create the master earlier
~master = MixerChannel(\master, s, 2, 2, level:1);

// restart the routine
r.play;

// reverb channel, feeding into the master
~rvbmc = MixerChannel.new("chn rvb", s, 2, 2, outbus:~master);

// play the reverb as an effect
~rvb = ~rvbmc.playfx({ |out|
   var numChan, maxDelay, preDelay, decay, numRefl, random;
   var sig, new, dlys;
   #numChan, maxDelay, preDelay, decay, numRefl, random = #[2, 0.181, 0.08, 4, 8, 0.1];
   sig = In.ar(out, numChan);
   new = sig;
   dlys = Array.fill(numRefl, {
      new = AllpassN.ar(new, maxDelay,
         Array.fill(numChan, { random.rand }) + preDelay, decay);
   });
   Mix.ar(dlys * Array.series(numRefl, 1, (numRefl+1).reciprocal.neg))
});
Looking at the synth window, you can see that the synth exists (and that CPU use has gone up noticeably). But, there's no change in the sound. That's because the source is not connected to the reverb yet.
~send = ~chan.newPostSend(~rvbmc, 0.41);
This statement returns a MixerPostSend object, which responds to some of the same messages as MixerChannel (setting level, level automation, changing outbus). There's also a MixerPreSend object, created by calling newPreSend on the MixerChannel.
Changing the level of the send changes the amount of reverb you hear. You can turn it off by setting the level to 0:
~send.level = 0;

~send.levelTo(0.8, 40);  // fade it in slowly over 40 seconds
Signal routing with the mixing board GUI
You can do many of these things from the mixing board GUI. Signals can be patched and repatched and levels adjusted to perfect a mix.
First, let's recreate the channels to start from a clean slate. Note that none of the channel specifies an outbus (all of them use bus 0).
If you haven't run the first block of code in this tutorial, do it now.
// first clear the old channels, to remove previous relationships
[~chan, ~rvbmc, ~master].do(_.free);

// recreate resources and restart routine
(
~master = MixerChannel(\master, s, 2, 2, level:1);
~chan = MixerChannel(\blippy, s, 2, 2);
~rvbmc = MixerChannel.new("chn rvb", s, 2, 2);

~dlysynth = ~chan.playfx(\blipDelay, [\bufnum, ~dlybuf.bufnum, \t_repan, 1]);

~rvb = ~rvbmc.playfx({ |out|
   var numChan, maxDelay, preDelay, decay, numRefl, random;
   var sig, new, dlys;
   #numChan, maxDelay, preDelay, decay, numRefl, random = #[2, 0.181, 0.08, 4, 8, 0.1];
   sig = In.ar(out, numChan);
   new = sig;
   dlys = Array.fill(numRefl, {
      new = AllpassN.ar(new, maxDelay,
         Array.fill(numChan, { random.rand }) + preDelay, decay);
   });
   Mix.ar(dlys * Array.series(numRefl, 1, (numRefl+1).reciprocal.neg))
});

r.play;
)
Now, let's open a mixing board. The mixing board has a name, a skin (nil uses a default that specifies the appearance you will see below--see the class MixerSkin), and a list of channels to include.
~board = MixingBoard("demo", nil, ~chan, ~rvbmc, ~master);
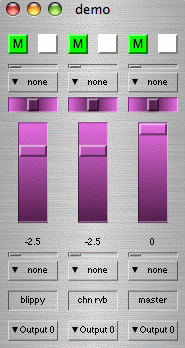
Each channel has a number of controls:
- at the top are mute and record buttons
- below that is a small fader and drop down menu representing a pre-fader send
- next, a pan control, followed by the level slider. The level is shown in decibels (0 is full, -inf is silent)
- another fader and drop down, this time for a post-fader send
- the MixerChannel name. You can drag and drop certain objects into this space--for instance, you can drag a different MixerChannel here, and the GUI will be reused for the second channel
- last, the outbus
Play with some of the controls. Note that the controls for reverb and master seem to have no effect. That's because no signals are flowing through them yet.
First, let's run blippy and reverb through the master fader. Click on the bottommost drop down, and you'll see a list of buses that are currently in use.
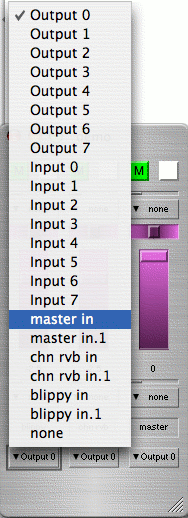
Choose "master in," and the MixerChannel is now playing through the master. Both level faders have an effect on the volume. Repeat this for reverb as well.
Note: It isn't advisable to set master's outbus to master! It doesn't make sense, because at least one channel should be outputting to the hardware buses (otherwise you won't have any sound).
Note that each channel also has a ".1" entry in the list. This will be the case when the MixerChannel had to allocate more than one bus for multi channel signals. Always choose the first bus belonging to the MixerChannel; otherwise, you could get signals from one channel bleeding over onto another.
We're still not using the reverb, so let's send something to it. On blippy, click on the post-fader send drop down and choose "chn rvb in."
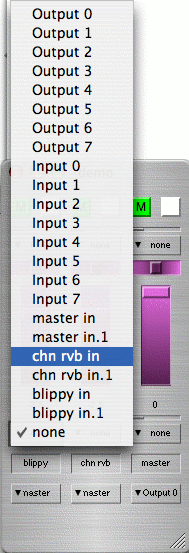
You still won't hear any reverb, because the send's level is zero. Move the post-fader send level slider to the right until you get the amount of reverb that sounds right to your ears.
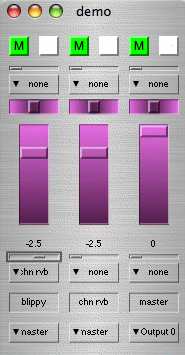
When you have settings you like, you can print out the the values so you can set the defaults for MixerChannels you use in performance.
~board.postSettings;
When you're finished, first stop the routine:
r.stop;
Then, you need only to close the window to free up all the channels.
Suggestion: If you're using Ubuntu, the default look and feel (GTK) features very large slider thumbs. This will cut down the resolution of panning sliders to an almost unusable level. You may wish to change to the Nimbus look and feel in your ~/.sclang.sc startup file.
g = SwingOSC.default;
g.options.javaOptions = "-Dswing.defaultlaf=com.sun.java.swing.plaf.nimbus.NimbusLookAndFeel";
g.boot;